Follow these instructions if your genome is not already in the main IGB QuickLoad site. To find out if your genome is already supported, see the instructions in Sharing data using QuickLoad sites.
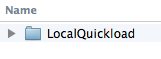
Create a QuickLoad root directory.
Create a QuickLoad root directory (folder) on your local computer or on a Web server.
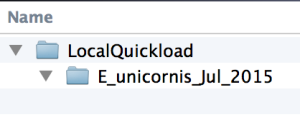
Create a genome directory.
Create a genome directory for the new, custom genome version you want to share via QuickLoad. To do this, create an IGB friendly name for your genome version and use this as the name of the genome directory.
Doing this will ensure that your genome version will be displayed correctly in the Current Genome tabbed panel menus. The IGB-friendly genome version name look like:
G_species_variety_MMM_YYYY
where
- "G" is the first letter of the genus
- "species" is the species name
- "variety" is the sub-species, cultivar or strain (this is optional)
- MMM is the three-letter English abbreviation in English for the month the genome version was released
- YYYY is the year the genome version was released
For example, H_sapiens_Dec_2013 is the IGB name for the human genome assembly released in Dec 2013.
You can also indicate subspecies, varieties, or individuals by including additional suffixes.
For example, there are two Oryza sativa (rice) subspecies in wide cultivation: japonica and indica.The first published rice genome sequence was from the japonica subspecies. Because an indica genome sequence is now available, we need names that distinguish them. We distinguish the japonica assemblies using prefix O_sativa_japonica and the month and year of release: O_sativa_japonica_Oct_2011. Annotations and sequence data reside in genome version folder O_sativa_japonica_Oct_2011 on the main IGB QuickLoad site. You can view its contents by clicking here.
There is no limit on the number of "_variety" suffixes you can include, provided the genome version name always ends with MMM_YYYY. By including the month and year in the genome version names, you ensure that IGB will display the latest genome version releases first in the Genome Version menu of the Current Sequence tab.
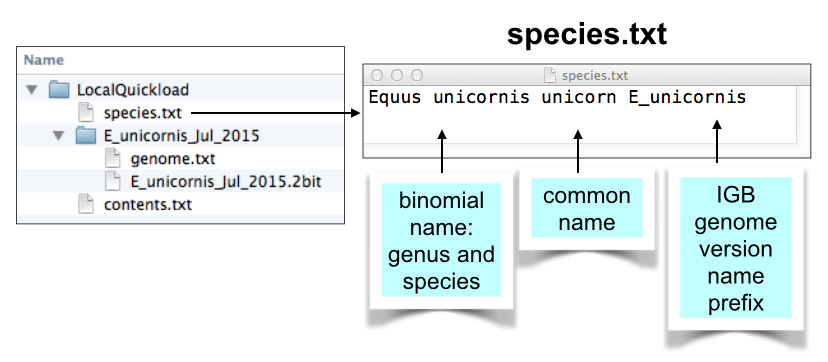
Before you pick a name, also look at the species.txt file that is packaged with every version of IGB. If your species is listed there, then use the genus and species prefix listed in column three of the file.
After picking an IGB-friendly name, create a sub-folder named for the genome version within the QuickLoad root directory:
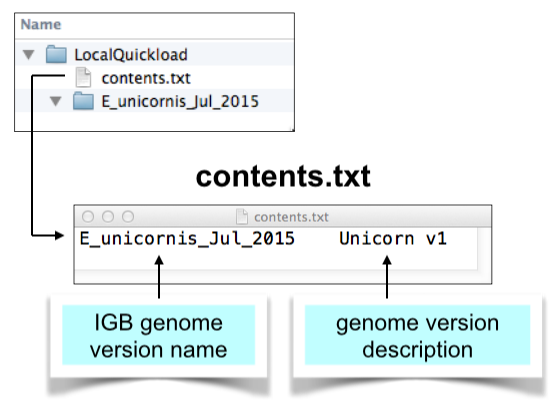
Create contents.txt file
Create a simple, plain text file called contents.txt and add it the top-level directory.
This file should be plain text, tab-delimited, with two columns separated by a tab character.
The first column should list names of the genome directories you have created and want to share.
The second column is optional - it contains text IGB will display on the title bar when you open IGB. View an example contents.txt: https://data.bioviz.org/quickload/contents.txt
To create a contents.txt file for your QuickLoad site:
- Open a text editor (e.g., NotePad or TextEdit).
- Type the genome version name.
- Type TAB.
- Type a brief description of the genome; this will appear in the IGB title bar when users open your genome version.
- Repeat 2 through 4 for each genome version you want to support in your QuickLoad site.
- Save the file as a plain text (".txt") file in your root QuickLoad directory - call it "contents.txt"
Save sequence data in twoBit format in the genome directory
Obtain sequence files and convert them to 2bit format, a binary format IGB can use to obtain all or part of the sequence data when you press the Get Sequence button, run a blast search, or open the Sequence Viewer window.
The 2bit format was first developed for the blat cDNA-to-genome alignment tool. IGB 2bit uses to support efficient retrieval of sequence data. To convert a fasta format file to twobit, use the faToTwoBit command-line tool from http://hgdownload.cse.ucsc.edu/admin/exe/.
To convert a fasta file to 2bit, open a terminal window and enter:
faToTwoBit FASTA.fa G_species_MMM_YYYY.2bit
The first argument (FASTA.fa) should be the fasta file with your sequence. The second argument (G_species_MMM_YYYY.2bit) should have the same name as your genome version and use the .2bit file extension.
Please this file inside your genome version directory:

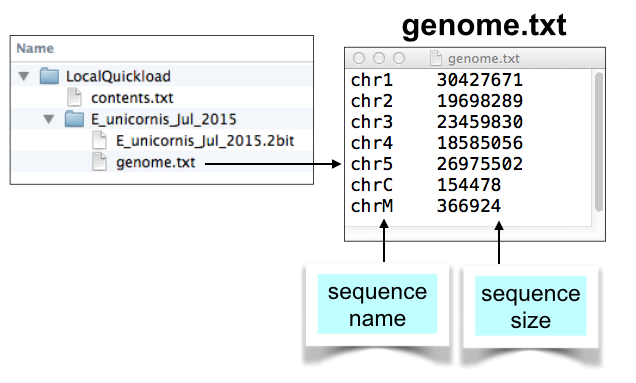
Make a genome.txt file using twoBitInfo
For each genome directory, create a genome.txt file that lists all the chromosomes in your genome, together with their sizes.
As with the contents.txt file, it should be tab delimited.
The first column lists the chromosome names and the second column lists their sizes. IGB uses this file to create the sequence selection table under the Data Access Panel.
Here is an example: https://data.bioviz.org/quickload/A_thaliana_Jun_2009/genome.txt
Create the genome.txt file from a sequence 2bit file (see below) using the twoBitInfo command-line tool, which is available from http://hgdownload.cse.ucsc.edu/admin/exe/.
To run twoBitInfo, open a terminal, change into the genome directory, and enter:
twoBitInfo G_species_MMM_YYYY.2bit genome.txt
The first argument is the name of the 2bit file you made in the previous step. The second argument is always the same: "genome.txt," the name of the genome information file twoBitInfo program creates.
Create annots.xml file listing available annotations and data sets.
Each genome version subdirectory needs an annots.xml file that is either empty or contains a listing of annotations you want to appear the Available Data Sets section of IGB's Data Access tabbed panel.
Here is a simple example:
<files>
  <file name="E_unicornis_Jul_2015.bed.gz"
   title="Gene models/Maker annotations"
   description="Results from Maker annotation pipeline"
   load_hint="Whole Sequence"
   label_field="title"
   background="FFFFFF"
   foreground="000000"
   max_depth="10"
   name_size="12"/>
</files>
When loaded into IGB, each file will create one track.
Note that the name attribute of the file tag indicates the physical location of the file relative to the directory where the annots.xml file resides. However, you can also use a URL to indicate the location of the file. This means that you if you want to reference other resources hosted on other machines, you can do it.
Also note that if you are hosting BAM or CRAM files, the index file (".bai" or ".crai") needs to reside in the same directory as the BAM or CRAM file. Otherwise, IGB will display an error message when users try to access the data.
For more information about annots.xml format, see: About annots.xml
Add annotation files.
Place your annotation, BAM, CRAM, or graph (bedgraph or bigwig) files into the appropriate genome sub-directories. You can you use any format IGB supports.
IGB QuickLoad can support BED, bedgraph, and GFF files that have been sorted, compressed, and indexed using the bgzip and tabix utilities. Doing this helps speed up data loading in IGB and allows loading data by region.
Create species.txt file
This file tells IGB how to populate the species and genome version selection menus in the Current Sequence tabbed panel. IGB contains a "built-in" list of species it supports, many of which are not yet sequenced or supported in the main IGB QuickLoad site.
To create your own species.txt file, follow these instructions. Be sure to include the G_species prefix in column three of the file.
Create synonyms.txt
This is a list of synonyms for genomes. This list allows you to match names across different QuickLoad sites and also the Galaxy workflow site. For example, if a QuickLoad site at another location uses different names to refer to the same genome version, you can specify these in the synonyms.txt. Each line contains any number of synonyms for a genome, separated by tabs.
To create your own synonyms.txt file, follow these instructions. Be sure to include the IGB genome version name in column 1 of the file.
Add your new QuickLoad site to IGB.
Tell IGB to use your new QuickLoad site.
Follow the directions in Adding and Managing Data Source Servers. To add the local server, click the "..." button and select the folder which contains the contents.txt file, e.g. "Quickload servers".