Step 1. Download and unzip: Download the attached template file SamplePlugin.zip.
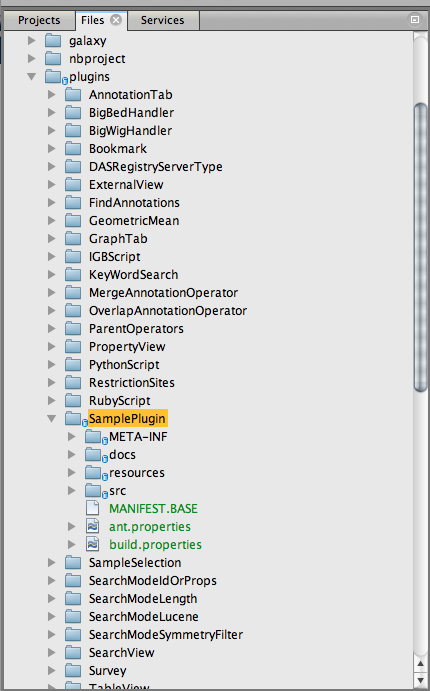
Step 2. Add the template folder: Copy and paste the folder to IGB source plugins folder, as seen in the following image.
Step 3. Change the plugin name: Change the name from SamplePlug to your name (e.g. MyPlugin)
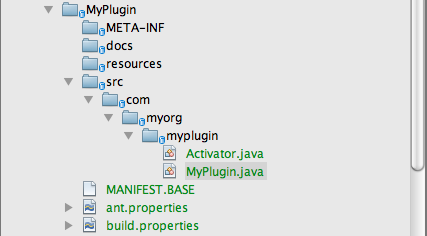
Step 4. Change the package: Change the package from com.affymetrix.igb.sampleplugin to your package name (e.g. com.myorg.myplugin). If you IDE does not support 'create folder' directly you can do this from your Finder (MacOS) or Windows Explorer, the directory is IGB_HOME/plugins/MyPlug/src
Step 5. Update Activator.java: Expand the sample plugin /src until you see Activator.java (and SamplePlugin.java).
Open Activator.java and update the code with your package declaration as well as occurrences of your plug in class name. The sample code implements an annotation operation, so Activator.java registers service for Alignment, Annotation and ProbeSet. Your plugin class name is inserted in the file as shown in the following code, as "MyPlugin".
@Override
protected ServiceRegistration<?>\[\] registerService(IGBService igbService) throws Exception {
	return new ServiceRegistration\[\] {
		bundleContext.registerService(Operator.class, new MyPlugin(FileTypeCategory.Alignment), null),
		bundleContext.registerService(Operator.class, new MyPlugin(FileTypeCategory.Annotation), null),
		bundleContext.registerService(Operator.class, new MyPlugin(FileTypeCategory.ProbeSet), null)
	};
}
Step 6. Update SamplePlugin.java: Open SamplePlugin.java in the same /src directory. Start by updating the class with your plugin name (e.g. MyPlugin), your package declarations and constructor(s). Overriding getDisplay() sets the display name in IGB (e.g. "My Operation"). We recommend overriding getName() with a descriptive name (string).
This sample code inherits AbstractAnnotationOperator and implements Operator interface to work as a new annotation operation. For more options refer to the Extension Points section.
public class MyPlugin extends AbstractAnnotationOperator implements Operator {

	MyPlugin(FileTypeCategory category){
		super(category);
	}

	@Override
	public String getName() {
		return this.category.toString().toLowerCase() +"_my_plugin";
	}

	@Override
	public String getDisplay() {
		return "My Operation";
	}

	private boolean overlap(BioSeq aseq, SeqSymmetry s0, SeqSymmetry s1) {
	}

	@Override
	public SeqSymmetry operate(BioSeq aseq, List<SeqSymmetry> symList) {

	}
}
Step 7. Update MAINFEST.BASE: Directly under the template /src (close /com), update the following highlighted fields in MAINFEST.BASE.
Manifest-Version: 1.0
Bundle-ManifestVersion: 2
<span style="color: #ff0000">Bundle-Name</span><span style="color: #000000">: MyPlugin</span>
<span style="color: #ff0000">Bundle-SymbolicName</span><span style="color: #000000">: com.myorg.myplugin.MyPlugin</span>
<span style="color: #ff0000">Bundle-Version</span><span style="color: #000000">: 0.0.9</span>
<span style="color: #ff0000">Bundle-Activator</span><span style="color: #000000">:</span> <span style="color: #000000">com.myorg.myplugin</span><span style="color: #000000">.Activator</span>
<span style="color: #000000">Bundle-ActivationPolicy: lazy</span>
<span style="color: #000000">Bundle-RequiredExecutionEnvironment: JavaSE-1.6</span>
<span style="color: #000000">Bundle-Description: Plugin to allow the user to create a plugin as template</span>
Bundle-DocURL: http://wiki.transvar.org![]() <span style="color: #ff0000"><a href="http://wiki.transvar.org">http://wiki.transvar.org
<span style="color: #ff0000"><a href="http://wiki.transvar.org">http://wiki.transvar.org![]() </a></span>
</a></span>
<span style="color: #ff0000">Import-Package</span>: com.affymetrix.common;version="[ (appVersion), (appVersion)]",
com.affymetrix.genometryImpl,
com.affymetrix.genometryImpl.operator,
com.affymetrix.genometryImpl.symmetry,
com.affymetrix.genometryImpl.parsers,
com.affymetrix.igb.osgi.service,
org.osgi.framework;version="1.5.0",
org.osgi.util.tracker;version="1.4.0"
- Bundle-Name - change to your plugin name
- Bundle-SymbolicName - change to your package path
- Bundle-Version - change to your plugin version
- Bundle-Activation - change to your Activator path (e.g. com.myorg.myplugin.Activator)
- Import-Package - include all the classes your are using in your source code
Step 8. Update ant.properties: Also found under the template /src, update the highlighted fields as follows.
name=MyPlugin
project=MyPlugin
classpath=${igb_service}/build:${window_service}/build:${common}/build:${igb}/build:${genometry}/build:${genoviz}/build:${osgi.impl}
plugin-jar=true
name=[your plugin name]
project=[your plugin name]
- classpath is updated with the necessary path; refer to the project build.xml for the actual paths listed, i.e. the path for igb_service or windows_service.
Step 9. Update build.properties for the project: Under the igb project folder, open the build.properties file and make the following changes:

Delete all the existing values and add your plugin name to the line not.include.bundles=
not.include.bundles=MyPlugin
Step 10.Generate .jar and .xml files for your plugin: After all files have been changed and save, "Clean and Build" IGB. Using Finder (MacOS) or Windows Explorer (WindowsOS), open IGB_HOME/plugins/ext and delete any files that are present. Open a command line prompt and run the following command:
ant externalBundles
Enter your svn password as necessary
Step 11. Move the .jar and .xml files to your plugin directory: There should be 2 generated files in IGB_HOME/plugins/ext, [MyPlugin].jar and repository.xml. Move these files to the folder (local or remote HTTP server) where you want your plugin site. Make sure to cut these files from from the IGB_HOME/plugins/ext folder, or delete after copying.
Step 12. Add your plugin repository: Run IGB and open the Plug-ins panel. Click Repositories... to open the Preferences > Plugin Repositories page and click Add....

- Enter your repository name; this name will only appear in the plugin site list.
- Enter the URL for your remote server or click '...' to select a local folder.
- Click 'Add Repository' button
Your plugin site is added to the list in Plugin Repositories:

Step 13. Activate your plugin: Your plugin appears in the Plug-ins panel. Install the plugin by checking 'Installed'.

Now let's take a look what the sample plugin looks like.
Load 2 annotations then select them by clicking with Shift, right click and we can see 'My Operation' is there:

Click 'My Operation' will generate a new track based on what the sample plugin does on these 2 annotations:
