This article demonstrates the IGB plug-able architecture using a simple example plugin that adds a menu item to the IGB Tools menu.
Introduction
Unlike old-style Java applications, IGB runs within an OSGi framework, also called the OSGI "container" or "runtime." This means you can easily extend IGB without modifying the core IGB code base. By implementing a few well-described interfaces and using the Apache maven project management tool, you can add new menu items, create new kinds of tracks, or connect IGB to all-new data sources - all without re-installing or even re-starting IGB.
This tutorial introduces the IGB platform by demonstrating a very simple IGB plug-in that adds a new entry to the IGB Tools menu.
See Setting up your Development Environment for recommendations on how to set up your machine to be more compatible with IGB Development practices.
Completed Project Example
Before reading through this tutorial, you may want to clone the completed IGB App project so that you can see a complete, working example of the Hello World IGB App.
Use the following command in Git to clone the completed IGB App project to your working directory.
git clone https://bitbucket.org/lorainelab/igb-app-hello-world.git
The image below shows an example of the IGB Tools Menu with the addition of a Hello World App item in the menu. The tutorial on this page will walk you through the steps required to add a menu item to one of the IGB menus, as seen in the image below. While this may seem trivial, it is not, because by adding a menu item to an IGB menu a developer can create an entry point that their IGB App can hook into.

To demonstrate how an IGB plugin could hook into and expand the IGB toolbar, you can write a new class that implements the MenuBarEntryProvider interface.
This interface is designed to allow App developers to add new menu items to the IGB application's top level menus.
IGB has seven top-level menus, as seen below:
The MenuBarEntryProvider interface contains the following methods, shown below. To add a new menu item to IGB, you'll create a class that implements this interface. In other words, you'll create a class that provides an IGB menu item to the OSGi run-time, which will add it to IGB as soon as it becomes available.
public interface MenuBarEntryProvider {
    public Optional<List<MenuItem>> getMenuItems();
	public MenuBarParentMenu getMenuExtensionParent();
 }
Build the App
To build your App, open the igb-app-hello-world project into Netbeans, select your project in the Projects tab, and then select Run > Build.
Alternatively, you can build it from the command line by entering:
mvn clean install
Install the App in IGB
Start IGB and add your target directory as a new plugin repository.
- Re-open IGB project (double-click it in the Projects tab or use File > Open Project)
- Open the IGB "main" sub-project; select IGB Project > Modules > main
- Select Run to run IGB
- Within IGB, select the Plug-Ins Tab
- Select Launch App Manager to open the App Manager window
- Within the App manager, select Manage Repositories... (top right corner). This opens the App Repositories tab in the IGB Preferences window
- Within the App Repositories tab in the Preferences window, select Add
- Enter a name for your repository, and then select the Choose local folder button
- Select the target directory of your maven project and click submit. The target directory is the actual target directory created by maven when you built your App.
- Close the Preferences window and return to the IGB App Manager
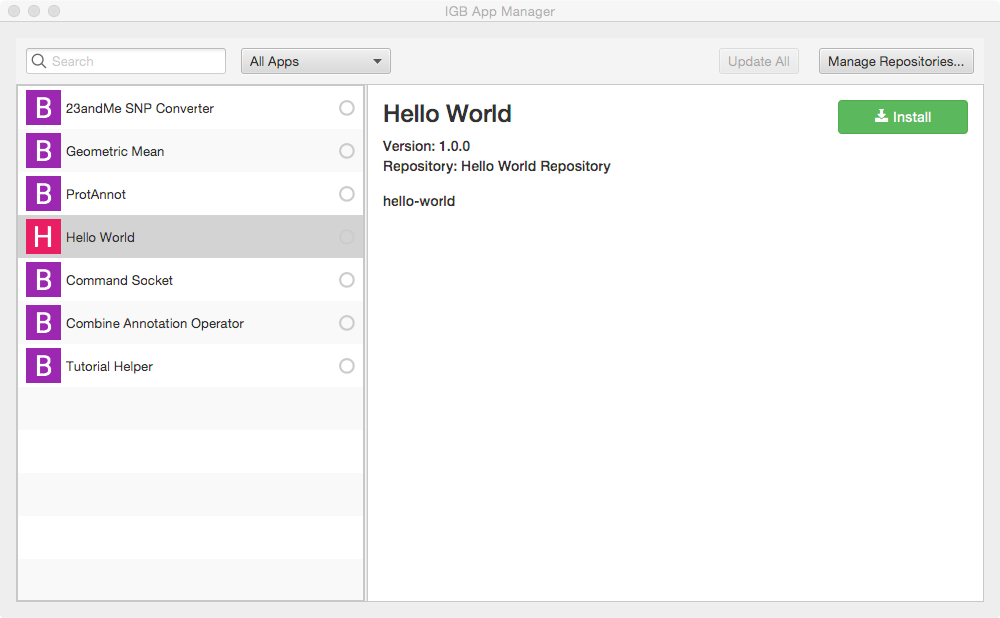
- Note that your App should now appear in the left pane of the IGB App Manager. Select it and click the Install button. This will cause the OSGi run-time to instantiate your new menu item and add it to IGB.


Run your new App
To run your app:
- Open the Tools menu in IGB. Observe your Hello World App menu item is an option.
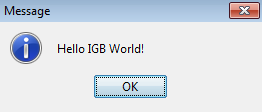
- Select Tools > Hello World App to run your App; observe the message that appears:
Note that your new menu item is an option under the Tools menu in IGB. If you return to the App Manager and uninstall your App, this menu item will disappear from IGB.
Next step: Modify your code (optional)
Re-open your IGB App project. Edit the message your IGB App prints and re-build your App. Then, return to the IGB App Manager, un-install and then re-install your App. When you select the the menu item again, the new message will print instead of the old one.
Note that you can rapidly repeat this edit-build-uninstall-install cycle. You don't have to re-build IGB or even restart it, which makes development much faster than if you had to modify the IGB code directly.
Next step: Make README.md for your App (optional)
Dissecting the Hello World IGB App
The rest of the information found on this page aims to give the developer a deeper understanding of the different pieces that allow the Hello World IGB App to hook into IGB.
Directory Structure
The Maven build system assumes that every Java project conforms to an expected directory structure. Here, the maven project includes
- pom.xml - located at the top level of the project. In IGB, an App's pom.xml file specifies which services the App needs to import from the IGB code base as well as any 3rd party libraries used by your App.
- src - contains source code, organized as shown. Every maven project contains src/main/java, which contains java packages organized as directories in the usual way. The example shows a single Java source code file/
To see the directory structure for your project in NetBeans, select the Files tab (next to the Projects tab).

HelloWorld pom.xml
***Need explanation of what the app's pom.xml file is for***
<project xmlns="http://maven.apache.org/POM/4.0.0" xmlns:xsi="http://www.w3.org/2001/XMLSchema-instance"
         xsi:schemaLocation="http://maven.apache.org/POM/4.0.0 http://maven.apache.org/xsd/maven-4.0.0.xsd">
    <modelVersion>4.0.0</modelVersion>
    <parent>
        <groupId>com.affymetrix</groupId>
        <artifactId>igb-project</artifactId>
        <version>9.0.0</version>
    </parent>
    <groupId>org.lorainelab.igb</groupId>
    <artifactId>org.lorainelab.igb.menu.api.example</artifactId>
    <version>1.0.0</version>
    <packaging>bundle</packaging>

    <name>IGB Menubar Extension</name>

    <dependencies>
        <dependency>
            <groupId>biz.aQute.bnd</groupId>
            <artifactId>bndlib</artifactId>
            <scope>provided</scope>
        </dependency>
          <dependency>
            <groupId>org.lorainelab.igb</groupId>
            <artifactId>org.lorainelab.igb.menu.api</artifactId>
            <scope>provided</scope>
        </dependency>
    </dependencies>

    <build>
        <plugins>
            <plugin>
                <groupId>org.apache.felix</groupId>
                <artifactId>maven-bundle-plugin</artifactId>
                <extensions>true</extensions>
                <executions>
                    <execution>
                        <id>build plugin repository</id>
                        <goals>
                            <goal>
                                index
                            </goal>
                        </goals>
                        <phase>package</phase>
                        <configuration>
                            <obrRepository>${project.build.directory}</obrRepository>
                            <mavenRepository>${project.build.directory}</mavenRepository>
                        </configuration>
                    </execution>
                </executions>
                <configuration>
                    <instructions>
                       <Bundle-SymbolicName>${project.artifactId}</Bundle-SymbolicName>
                        <Import-Package>*</Import-Package>
                        <Export-Package/>
                        <Service-Component>*</Service-Component>
                    </instructions>
                </configuration>
            </plugin>
        </plugins>
    </build>
</project>
parent tag
<parent>
    <groupId>com.affymetrix</groupId>
    <artifactId>igb-project</artifactId>
    <version>9.0.0</version>
</parent>
In the image below, you can see that the IGB version of 9.0.0 is seen in the app's pom.xml.

packaging tag
This tag specifies packaging type - e.g., war or jar. In IGB, we use an OSGi-specific packaging structure called a "bundle," which is a jar file with additional metadata. This additional metadata transforms an ordinary jar file into a plug-able module in the OSGi runtime. The IGB project uses the Apache Felix Maven Bundle plugin (BND) to generate this metadata. The BND bundle defines the packaging type "bundle."
<packaging>bundle</packaging>
name tag
This should be a user-friendly name for your App suitable for display in the IGB App Manager list of available Apps. This tag is optional; if you don't include it, then the App Manager will list your App's artifactId.
<name>IGB Menubar Extension</name>
dependency tags (parent tag "dependencies")
The term "dependency" just means: third-party resources your project requires to compile and run, such as library files.
Your pom.xml file should contain a single "dependencies" tag with several "dependency" child tags:
biz.aQute.bnd:bndlib
This dependency enables the Declarative Services annotations used within the IGB code base that allow easy service consumption and registration with the IGB OSGi component runtime.
Note how that scope tag is "provided" - this is because the parent pom.xml file defines this dependency in its dependencyManagement tag. When mvn compiles your App, mvn will retrieve necessary metadata about the dependency, such as its version and other information, from the parent pom.
<dependency>
   <groupId>biz.aQute.bnd</groupId>
   <artifactId>bndlib</artifactId>
   <scope>provided</scope>
</dependency>
org.lorainelab.igb
***Need description here***
<dependency>
    <groupId>org.lorainelab.igb</groupId>
    <artifactId>org.lorainelab.igb.menu.api</artifactId>
    <scope>provided</scope>
</dependency>
build, plugins, and plugin tag
maven-bundle-plugin
This is the most important plugin to be aware of as an IGB module developer. This plugin is known as the "Swiss army knife of OSGi" and is a wrapper around the BND project described in the previous section.
	<build>
        <plugins>
            <plugin>
                <groupId>org.apache.felix</groupId>
                <artifactId>maven-bundle-plugin</artifactId>
                <extensions>true</extensions>
                <executions>
                    <execution>
                        <id>build plugin repository</id>
                        <goals>
                            <goal>
                                index
                            </goal>
                        </goals>
                        <phase>package</phase>
                        <configuration>
                            <obrRepository>${project.build.directory}</obrRepository>
                            <mavenRepository>${project.build.directory}</mavenRepository>
                        </configuration>
                    </execution>
                </executions>
                <configuration>
                    <instructions>
                       <Bundle-SymbolicName>${project.artifactId}</Bundle-SymbolicName>
                        <Import-Package>*</Import-Package>
                        <Export-Package/>
                        <Service-Component>*</Service-Component>
                    </instructions>
                </configuration>
            </plugin>
        </plugins>
    </build>
There are several important things to understand about the above configuration.
- This plugin is responsible for generating all of the OSGi metadata required to build your App "artifact" - a jar file with metadata making it into an OSGi module.
- The metadata can optionally include service component definition files as described in the OSGi Declarative Services Specification (See http://wiki.osgi.org/wiki/Declarative_Services for more information)
- We use annotations in our java code which are processed at compile time by the felix maven bundle plugin to generate the service component definition files for a bundle.
- This plugin is also configured above in the "build plugin repository" execution to generate OBR (Object Bundle Repository) metadata in the build directory (i.e. the target directory) of the project. This directive is useful because it allows you to add your App's target directory as a local App Store (plugin repository) to IGB so that you can run your new App
Creating a new Java class (MenuBarExtensionExample)
The Hello World IGB App from the completed project example uses a Java class called MenuBarExtensionExample. If you wish to create this class yourself, you can do so in Netbeans by following the instructions below.
- Within NetBeans, check that your IGB Menubar Extension project is the currently selected project. If it isn't, select File > Open Project to open it.
- Next, create a new Java class named MenuBarExtensionExample:
- Select File > New File
- Select Java Class as your file type.
- Select Next
- Enter class Name MenuBarExtensionExample
- Select package org.lorainelab.igb.menu.api.example
- Select Finish

Your newly created class should match the code seen below:
package org.lorainelab.igb.menu.api.example;
import aQute.bnd.annotation.component.Component;
import java.util.Arrays;
import java.util.List;
import java.util.Optional;
import javax.swing.JOptionPane;
import org.lorainelab.igb.menu.api.MenuBarEntryProvider;
import org.lorainelab.igb.menu.api.model.MenuBarParentMenu;
import org.lorainelab.igb.menu.api.model.MenuItem;
@Component(immediate = true)
public class MenuBarExtensionExample implements MenuBarEntryProvider {

    @Override
    public Optional<List<MenuItem>> getMenuItems() {
        MenuItem menuItem = new MenuItem("Hello World App", (Void t) -> {
            JOptionPane.showMessageDialog(null, "Hello IGB World!");
            return t;
        });
        menuItem.setWeight(1000000000);
        return Optional.ofNullable(Arrays.asList(menuItem));
    }

    @Override
    public MenuBarParentMenu getMenuExtensionParent() {
        return MenuBarParentMenu.TOOLS;
    }
}
If you need help with this process or wish to discuss any other issues with the IGB team, please do not hesitate to contact us.