| Table of Contents |
|---|
Introduction
This procedure is designed to help you create the files that are needed to install your plug-in within IGB. The first section contains steps to modify your local copy of the IGB code in order to generate the needed files. You should have an updated, local copy of the IGB code or check out the most recent version from Sourceforge.
The second section takes you through the creation of the plugin files. These are the files that allow the plugin to be installed as well as distributed.
The third section is a brief walk-through on installing and testing your plugin.
Modifying the IGB code
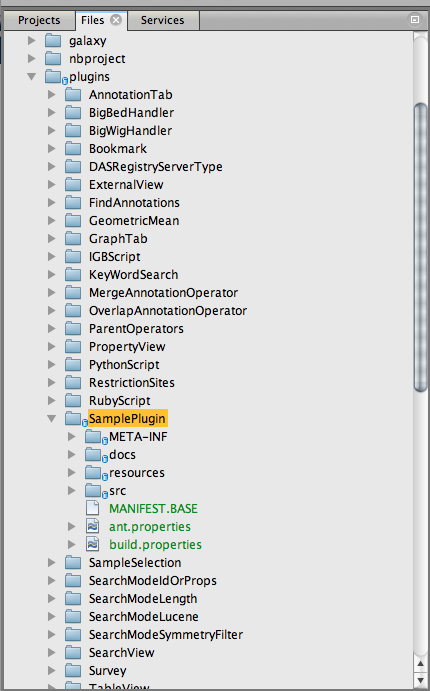
Step 1. Download and unzip: Download the attached template file file SamplePlugin.zip.
Step 2. Add the template folder: Copy and paste the template folder to IGB source plugins folder, as seen in the following image.
 Update files:
1Step 3. Change the plugin name: Change the name from 'SamplePlug' to your customized name such as 'MyPlugin' (your plugin name)2name (e.g. MyPlugin)
Step 4. Change the package: Change the package from 'com.affymetrix.igb.sampleplugin' to your package name i(e.eg. ' com.myorg.myplugin'). If you your IDE does not support 'create folder' directly you can do this from your Finder (MacOS) or Windows Explorer, the (WindowsOS). The directory is IGB_HOME/plugins/MyPlugMyPlugin/src
3. Expand src from your IDE until you see the Activator.java and SamplePlugin.java, update the 'SamplePlugin.java' to your plugin name and change all the necessary package declaration, class name and constructor(s). 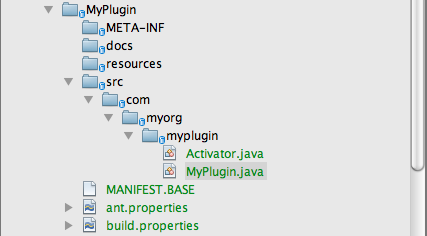
4. Update MAINFEST.BASE
...
Step 5. Update Activator.java: Expand the src folder until you see Activator.java (and SamplePlugin.java).
Open Activator.java and update the code with your package declaration as well as occurrences of your plug in class name. The sample code implements an annotation operation, so Activator.java registers service for Alignment, Annotation and ProbeSet means this plugin is designed only for these 3 types of annotations. Actually this SamplePlugin derives from the existing IGB plugin named OverlapAnnotationOperator which you can find it in the plugins folder.
There are also many other different types of operation for annotation and graph created as a plugin or not, such as MergeAnnotationOperator plugin and XorOperator in core folder then com.affymetrix.genometryImpl.operator package.
Your plugin class name is inserted in the file as shown in the following code, as "MyPlugin".
| Code Block | ||||
|---|---|---|---|---|
| ||||
@Override
protected ServiceRegistration<?>[] registerService(IGBService igbService) throws Exception {
	return new ServiceRegistration[] {
		bundleContext.registerService(Operator.class, new MyPlugin(FileTypeCategory.Alignment), null),
		bundleContext.registerService(Operator.class, new MyPlugin(FileTypeCategory.Annotation), null),
		bundleContext.registerService(Operator.class, new MyPlugin(FileTypeCategory.ProbeSet), null)
	};
}
|
Step 6. Update SamplePlugin.java: Open SamplePlugin.java in the same directory with Activator.java. Start by updating the class with your plugin name (e.g. MyPlugin), your package declarations and constructor(s). Overriding getDisplay() sets the display name in IGB (e.g. "My Operation"). We recommend overriding getName() with a descriptive name (string).
This sample code inherits AbstractAnnotationOperator and implements Operator interface to work as a new annotation operation. For more options refer to the Extension Points section.
| Code Block | ||||
|---|---|---|---|---|
| ||||
public class MyPlugin extends AbstractAnnotationOperator implements Operator {

	// Constructor
	MyPlugin(FileTypeCategory category){
		super(category);
	}

	// Method to determine the internal plugin name
	@Override
	public String getName() {
		return this.category.toString().toLowerCase() +"_my_plugin";
	}


	// Method to determine the display name for the operation
	@Override
	public String getDisplay() {
		return "My Operation";
	}


	// Private method to check if two symmetries are overlapped used by the operate()
	private boolean overlap(BioSeq aseq, SeqSymmetry s0, SeqSymmetry s1) {
		return s0.getSpan(aseq) != null && s1.getSpan(aseq) != null && s0.getSpan(aseq).getMax() > s1.getSpan(aseq).getMin() && s0.getSpan(aseq).getMin() < s1.getSpan(aseq).getMax();
	}


	// Core code for the operation which loops over input symmetries and return the overlapped ones
	@Override
	public SeqSymmetry operate(BioSeq aseq, List<SeqSymmetry> symList) {
		SimpleSymWithProps result = new SimpleSymWithProps();
		result.setProperties(new HashMap<String,Object>());
		TypeContainerAnnot t0 = (TypeContainerAnnot)symList.get(0);
		TypeContainerAnnot t1 = (TypeContainerAnnot)symList.get(1);
		result.setProperty("type", t0.getType() + " " + getName());

		for (int i = 0; i < t0.getChildCount(); i++) {
			SeqSymmetry s0 = t0.getChild(i);
			for (int j = 0; j < t1.getChildCount(); j++) {
				SeqSymmetry s1 = t1.getChild(j);
				if (overlap(aseq, s0, s1)) {
					result.addChild(s0);
					result.addSpan(s0.getSpan(aseq));
					break;
				}
			}
		}
		return result;
	}
|
You can refer more operations in plugins or com.affymetrix.genometryImpl.operator package in core folder.
Step 7. Update MAINFEST.BASE: Directly under the [MyPlugin] folder, update the following highlighted fields for MAINFEST.BASE.
| Panel |
|---|
Manifest-Version: 1.0 |
...
- Bundle-Name - change to your plugin name
- Bundle-SymbolicName - change to your package path
- Bundle-Version - change to your plugin version
- Bundle-Activation - change to your Activator path (e.g. com.myorg.myplugin.Activator)
- Import-Package - include all the classes your are using in your source code
Step 8. Update ant.properties: Also found under [MyPlugin] folder, update the highlighted fields as follows.
| Panel |
|---|
name=SamplePluginMyPlugin |
6. Update project's build.properties
...
- name=[your plugin name]
- project=[your plugin name]
- classpath is updated with the necessary paths; refer to the project build.xml for the actual paths listed, i.e. the path for igb_service, windows_service, etc.
Step 9. Update build.properties for the project: Under the IGB project folder(not the build.properties file in your plugin folder), open the build.properties file:

Find the line not.include.bundles=', delete and replace all the existing values and add with your plugin name:.
| Panel |
|---|
not.include.bundles=MyPlugin |
Creating the .jar and .xml for your plugin
| Note |
|---|
This document refers to "IGB_HOME". This is the home directory for your downloaded IGB code. If you made no changes during or after the download, then the source folder will be named genoviz-code. |
Step 1. Generate .jar and .xml files for your plugin: After all IGB files have been changed and saved, "Clean and Build" IGB.
Delete files in Step 2. Remove unneeded files: Use Finder (MacOS) or Windows Explorer (WindowsOS) to open IGB_HOME/plugins/ext
In command line, go to IGB_HOME, run command
| Panel |
|---|
ant externalBundles |
and delete any files that are present.
Step 3: Use command line to generate files: Open your command line prompt.
- First, you will need to temporarily change the JAVA_HOME to point to version 1.6 if you are currently running java 1.7 or higher. The commands are OS specific, but an example for Mac is:
| Panel |
|---|
export JAVA_HOME=`/usr/libexec/java_home -v 1.6` |
- Next, using a command line prompt, navigate to IGB_HOME folder and run the following command (Enter your svn password as necessary):
| Panel |
|---|
ant externalBundles |
Step 4. Move the .jar and .xml files to your plugin directory: There should be 2 generated files in IGB_HOME/plugins/ext (, [MyPlugin].jar and repository.xml) to the . Move these files to your plugin repository folder (local or remote HTTP server) where you want your plugin site on
. Make sure you are to cut these files from from the IGB_HOME/plugins/ext (folder, or delete it after copying.
Step 5 (optional): Revert IGB code: You can now revert all of the code changes you have made, if you wish, or simply change the name of the plugin in all appropriate code locations to create files for another plugin.Run IGB -> "
Installing and testing your plugin
Step 1. Add your plugin repository: Run IGB and open the Plug-ins' tab panel. Click 'Repositories...' button to open the Plugin configuration panelEnter the name you want to name, this can be any name you like since it will only show Preferences > Plugin Repositories page and click Add....

- Enter your repository name; this name will only appear in the plugin site list.
- Enter the URL for your remote server
...
OR
...
- or click '...'
...
- to select
...
- a local folder.
- Click 'Add Repository' button
...
Your plugin site is added into to the site list, also your plugin MyPlugin is showing list in Plugin Repositories:

Step 2. Install your plugin: Your plugin appears in the Plug-ins tab in IGB after close the configuration panel panel. Install the plugin by checking Installed.

Step 3. Check to ensure your plugin appears in the proper GUI location:
For our SamplePlugin, My Operation, we load and select 2 annotations. Right-click in the track label of a selected track to open the Context menu, and under Track Operations we can see 'My Operation'.

Choosing 'My Operation' generates a new track, as expected.
