Moving through your data
IGB has multiple different methods to allow you to move horizontally, and vertically, and explore your data. Each method has its advantages, so be sure to try them.
Horizontal scroller
Use the horizontal scroller to move the display from left to right. The image below shows the horizontal scrollbar, with directional arrows at the end. To use the scroller, click-drag the thumb (see red arrow and red box) and move it left or right. Note however that when you are zoomed in, scrolling moves the display very quickly and you may lose track of the region you were viewing. The horizontal scroller works best when you're zoomed out on large regions.
To move short distances, click the icons on the right side of the scroller (see blue arrow and blue box).
Click-drag
Click-drag the selection tool (see red box below) to move in a more controlled fashion through the data. Choose the selection tool (default tool) and then click anywhere near the edge of the image. Keep the mouse pressed and drag the cursor (arrow) to the left or right. The display will continue moving at a steady pace for as long as the click-drag is held. This click-drag interaction is similar to the select-scrolling in many word processing programs, where you can select text and then, by continuing to select/drag the cursor up or down, you scroll through the document.
Grab-drag
This new feature debuted in IGB 6.5. Here, you select the Grab tool ("cartoon hand") and click it within the display. Use it to drag the display in the direction you want to move.This is the opposite direction from click-drag movement, and can be more intuitive to some users. It also moves at the speed that the user moves the mouse, whereas click-drag moves at a steady pace. On the other hand, grab-drag can only move the image to the edge of the main window. You must re-grab to continue moving.
This form of movement can also be used to shift the image vertically if the vertical zoom is active.
Note: After moving to an area of interest, you will need to change back to the Select tool (to the left of the Grab tool) in order to select annotations or elements within the image.
Autoscroll
This is a very useful feature for scanning large regions at medium zoom levels.
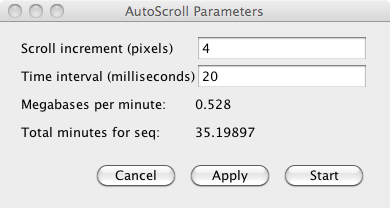
You can set the speed of movement in the window (see image below), and
| Table of Contents |
|---|
Introduction
Moving the IGB display without changing zoom level is called "panning," a term borrowed from film. Panning is also called "scrolling."
When you are zoomed in, only part of your data are visible and much of it is off-screen. The data display area is like the viewfinder of a camera that only shows you part of the surrounding scene. Use IGB's panning controls to move the data display area and view a different part of the genomic data scene.
Because moving through the data scene is an key aspect of data exploration and analysis, IGB offers many ways to pan the display.
To pan the display in IGB, you can
- Click-drag using the Move tool
- Use the horizontal or vertical scrollbars
- Click-drag the selection tool right or left
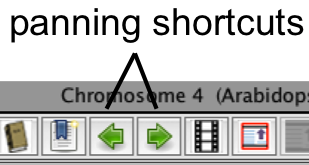
- Click the toolbar panning shortcuts
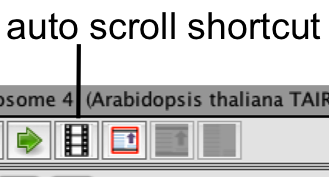
- Turn on Auto scroll
Grab tool
The Move tool allows you to move in any direction by click-dragging the display.
To use the Move tool
- Select the Move tool

- Click and drag the display to move in any direction
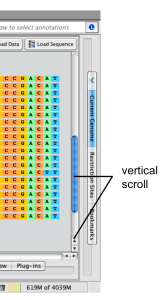
Scrollbars
The horizontal and vertical scrollbars move the display up and down, similar to how scrollbars function in other applications.
To pan the display using the scrollbars, click the gutter or click-drag the thumb from left to right. You can also click the ends of the scrollbar.
Horizontal scrollbar (click to enlarge)

Vertical scrollbar (click to enlarge)
| Note |
|---|
Horizontal scroll works best when you're zoomed out. |
Click-drag left or right
Click-drag the Selection tool into the left or right side of the data display area to move left or right.
To move left or right using the Selection tool
- Select the Selection tool

- Click and hold the mouse in an empty area of the data display area
- Drag the mouse into the left or right edge of the display
- Release the mouse to stop scrolling
Arrow toolbar shortcuts
You can use the right and left arrow shortcuts to pan left or right.
Auto Scroll
Use Auto Scroll to scan through large regions at medium zoom levels. IGB will move through the image, from left to right, at a set speed you define. Autoscroll can be accessed through the View menu.
Resolution reflects the zoom level of the image. This can be set by hand, or just left 'as is' if you have already gone to the zoom level you prefer. Scroll increment is distance (in pixels) the image shifts each time it moves; Time interval is the speed at which the image moves. These three elements work together to affect the final scrolling speed of your data at your chosen zoom level. We recommend setting the zoom level based on the image, then adjust the time or scroll until it is moving at a level comfortable for you. Megabases per minute and Total minutes for seq. will give you an idea of the final Autoscroll speed.
Note: You can designate a keyboard shortcut to activate or halt autoscrolling; go to File > Preferences > Shortcuts. Setting a shortcut key will allow you to start and stop the autoscrolling quickly and easily.
To activate autoscroll
- Click the Autoscroll icon in the toolbar
or
- Select Tools > Start Auto Scroll.
To set auto scroll speed
- Select Tools > Configure Auto Scroll...
- Enter values
- Click Apply to apply the new speed settings
- Click Start to start auto scroll
Auto Scroll configuration window