This article demonstrates the IGB plug-able architecture using a simple example plugin that adds a menu item to the IGB Tools menu.
| Table of Contents |
|---|
Introduction
...
Overview
IGB runs within an OSGi framework, also called the an OSGI "container" or "runtime." This means you can easily extend IGB without modifying the core IGB code base. By implementing a few well-described interfaces and using the Apache maven project management tool, you can add new menu items, create new kinds of tracks, or connect IGB to all-new data sources - all functionality without re-installing or even re-starting IGB.
This tutorial introduces the IGB platform by demonstrating a very simple IGB plug-in App that adds a new entry to the IGB Tools menu.
Completed Project Example
...
Requirements
- Install Java version 1.8 for your platform from Oracle (https://bitbucket.org/lorainelab/igb-app-hello-world.git
IGB Tools Menu Example
The image below shows an example of the IGB Tools Menu with the addition of a Hello World App item in the menu.

| Info |
|---|
By adding a menu item to an IGB menu, as seen above, a developer can create an entry point that their IGB App can hook into. |
Get the IGB code base - clone the IGB repository from Bitbucket
Go the IGB source code repository, hosted on Bitbucket. Copy the repository address and clone it onto your computer. Place the checked-out project in your NetBeansProjects directory.
Also, see Developing IGB for instructions.
Checkout an IGB branch (optional)
If you are planning to share your plug-in with current IGB users, you should check out code corresponding to the current or upcoming release. If you want to develop for an upcoming release of IGB, use the master branch.
| Info |
|---|
| As of December 2015, menu-related APIs on the master branch (the development branch) differ from the released versions, e.g., the releaseCandidate branch, and are not yet backward compatible. If developing a new App based on the tutorials, use the master branch. |
The master branch is checked out by default when you clone the repository. To check out a different branch or release tag:
- Change into your cloned IGB project directory
- Use git to check out the the branch or tag you want to use
- Run git clean to remove untracked files after checking out the new branch
For example:
| Code Block | ||||
|---|---|---|---|---|
| ||||
git checkout master # check out current or upcoming minor release of IGB
|
Note that when you switch branches, files present in the first branch that are not present in newly checked-out branch with remain - git won't delete them. Running the "git clean" command will remove them.
Note also that the version of the IGB code base you use for developing a new IGB App will depend on when you plan to share your App with users. The IGB team recommends you develop your App using the master branch so that you will can take advantage of the latest, most powerful API features, but if you want to release your App right away, then you should use whichever version of IGB your target audience is using - typically whatever release is available on the BioViz.org Web site. To decide which version makes the most senses for you, you'll need to understand how branches and tags in the IGB git repository correspond to versions of IGB downloaded by users. See About the code base.
Build the App
To build your App, select Run > Build in NetBeans.
Alternatively, you can build it from the command line by entering:
| Code Block | ||
|---|---|---|
| ||
mvn clean install |
Install the App in IGB
Start IGB and add your target directory as a new plugin repository (local App store)
- Re-open IGB project (double-click it in the Projects tab or use File > Open Project)
- Open the IGB "main" sub-project; select IGB Project > Modules > main
- Select Run to run IGB
- Within IGB, select the Plug-Ins Tab
- Select Launch App Manager to open the App Manager window
- Within the App manager, select Manage Repositories... (top right corner). This opens the App Repositories tab in the IGB Preferences window
- Within the App Repositories tab in the Preferences window, select Add
- Enter a name for your repository, and then select the Choose local folder button
- Select the target directory of your maven project and click submit. The target directory is the actual target directory created by maven when you built your App.
- Close the Preferences window and return to the IGB App Manager
- Note that your App should now appear in the left pane of the IGB App Manager. Select it and click the Install button. This will cause the OSGi run-time to instantiate your new menu item and add it to IGB.


Run your new App
To run your app:
- Open the Tools menu in IGB. Observe your Hello World App menu item is an option.
- Select Tools > Hello World App to run your App; observe the message that appears:
| Info |
|---|
Note that your new menu item is an option under the Tools menu in IGB. If you return to the App Manager and uninstall your App, this menu item will disappear from IGB. |
Next step: Modify your code (optional)
...
- docs.oracle.com/javase/8/docs/technotes/guides/install/install_overview.html).
- Install NetBeans or other integrated development environment (IDE).
- Clone a copy of the Hello World App source code from Bitbucket - https://bitbucket.org/lorainelab/hello-world-igb-app
Compile the App
Open the hello-world project in Netbeans (or your preferred IDE).
In Netbeans, select the Hello World IGB App from the Projects tab, right-click, and select Build.
Building the App creates a new directory named "target" which can serve as a new App repository. This new directory contains compiled code as well as a meta-data about the App it contains.
Add target directory as new App repository
Normally, Apps are deployed on-line in a Web-accessible location called an "App Store." This enables multiple users to install and run them.
However, you can also deploy an App Store on your local computer - useful for developing and testing new Apps.
To add your target directory as a local App Store:
- Start IGB
- Select Tools > Open App Manager
- Click Manage Repositories... button (opens Plug-in Repositories tab in Preferences window)
- Click Add... button (opens Plugin Repository dialog)
- Enter a name for your repository (can be anything)
- Click Choose local folder button
- Select the "target" folder in your igb-app-hello-world project folder.
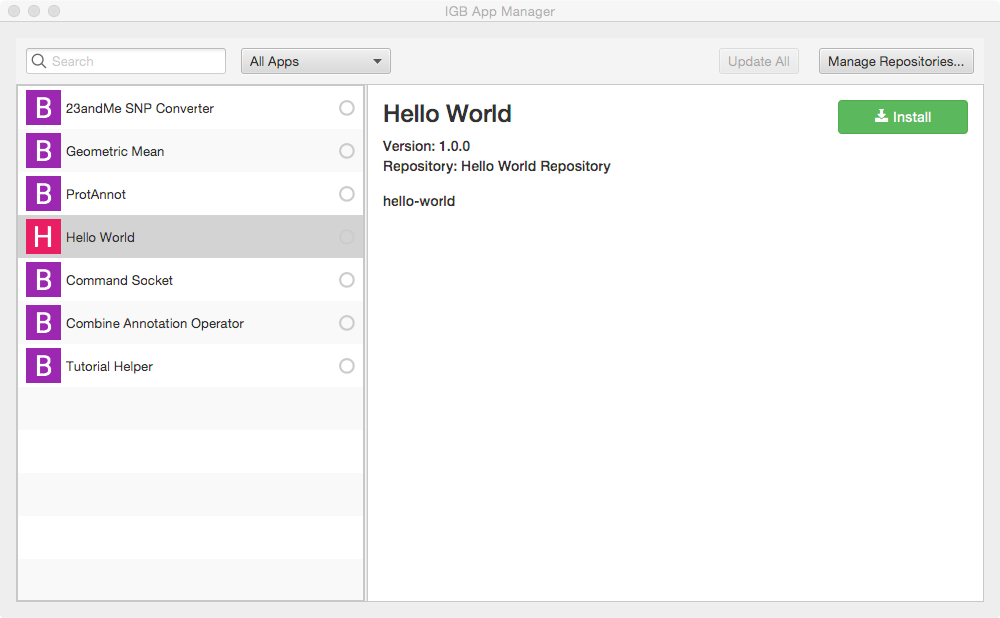
Once you add "target" as a new local App repository, you should see the Hello World App added as a new App in the IGB App Manager window, as shown below:
Install App
To install the hello world App:
- Select Tools > Open App Manager
- Select the App
- Click Install
To check that installation worked correctly, select the Tools menu. Check that there is now a new menu item named Hello World.
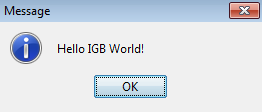
Run App
To run the App:
- Select Edit > Hello World App
- Observe a dialog appears containing the message "Hello IGB World!
Next step: Modify your code
Open the file HelloWorldIgbApp.java in the Netbeans editor. Edit the message your IGB App prints and re-build your App. Then, return to the IGB App Manager, un-install and then re-install your App. When you select the the menu item again, the a dialog should appear showing your new message will print instead of the old one.
Note that you can rapidly repeat this edit-build-uninstall-install cycle. You don't have to re-build IGB or even restart it, which makes development much faster than if you had to modify the IGB code directly.
Next step: Make README.md for your App (optional)
Dissecting the Hello World IGB App
Directory Structure
The Maven build system assumes that every Java project conforms to an expected directory structure. Here, the maven project includes
- pom.xml - located at the top level of the project. In IGB, an App's pom.xml file specifies which services the App needs to import from the IGB code base as well as any 3rd party libraries used by your App.
- src - contains source code, organized as shown. Every maven project contains src/main/java, which contains java packages organized as directories in the usual way. The example shows a single Java source code file/
To see the directory structure for your project in NetBeans, select the Files tab (next to the Projects tab).

Many Apps will include image files and other content. To include these, create a directory named "resources" at the same level as the pom.xml file, as seen in the image above. is this accurate???
HelloWorld pom.xml
***Need explanation of what the app's pom.xml file is for***
| Code Block |
|---|
<project xmlns="http://maven.apache.org/POM/4.0.0" xmlns:xsi="http://www.w3.org/2001/XMLSchema-instance"
         xsi:schemaLocation="http://maven.apache.org/POM/4.0.0 http://maven.apache.org/xsd/maven-4.0.0.xsd">
    <modelVersion>4.0.0</modelVersion>
    <parent>
        <groupId>com.affymetrix</groupId>
        <artifactId>igb-project</artifactId>
        <version>9.0.0</version>
    </parent>
    <groupId>org.lorainelab.igb</groupId>
    <artifactId>org.lorainelab.igb.menu.api.example</artifactId>
    <version>1.0.0</version>
    <packaging>bundle</packaging>

    <name>IGB Menubar Extension</name>

    <dependencies>
        <dependency>
            <groupId>biz.aQute.bnd</groupId>
            <artifactId>bndlib</artifactId>
            <scope>provided</scope>
        </dependency>
          <dependency>
            <groupId>org.lorainelab.igb</groupId>
            <artifactId>org.lorainelab.igb.menu.api</artifactId>
            <scope>provided</scope>
        </dependency>
    </dependencies>

    <build>
        <plugins>
            <plugin>
                <groupId>org.apache.felix</groupId>
                <artifactId>maven-bundle-plugin</artifactId>
                <extensions>true</extensions>
                <executions>
                    <execution>
                        <id>build plugin repository</id>
                        <goals>
                            <goal>
                                index
                            </goal>
                        </goals>
                        <phase>package</phase>
                        <configuration>
                            <obrRepository>${project.build.directory}</obrRepository>
                            <mavenRepository>${project.build.directory}</mavenRepository>
                        </configuration>
                    </execution>
                </executions>
                <configuration>
                    <instructions>
                       <Bundle-SymbolicName>${project.artifactId}</Bundle-SymbolicName>
                        <Import-Package>*</Import-Package>
                        <Export-Package/>
                        <Service-Component>*</Service-Component>
                    </instructions>
                </configuration>
            </plugin>
        </plugins>
    </build>
</project>
|
parent tag
| Code Block | ||
|---|---|---|
| ||
<parent>
     <groupId>com.affymetrix</groupId>
     <artifactId>igb-project</artifactId>
     <version>8.6.0</version>
</parent> |
...

packaging tag
This tag specifies packaging type - e.g., war or jar. In IGB, we use an OSGi-specific packaging structure called a "bundle," which is a jar file with additional metadata. This additional metadata transforms an ordinary jar file into a plug-able module in the OSGi runtime. The IGB project uses the Apache Felix Maven Bundle plugin (BND) to generate this metadata. The BND bundle defines the packaging type "bundle."
| Code Block | ||
|---|---|---|
| ||
<packaging>bundle</packaging> |
name tag
This should be a user-friendly name for your App suitable for display in the IGB App Manager list of available Apps. This tag is optional; if you don't include it, then the App Manager will list your App's artifactId.
| Code Block | ||||
|---|---|---|---|---|
| ||||
<name>Hello World</name> |
dependency tags (parent tag "dependencies")
The term "dependency" just means: third-party resources your project requires to compile and run, such as library files.
Your pom.xml file should contain a single "dependencies" tag with several "dependency" child tags:
| Code Block | ||||||||
|---|---|---|---|---|---|---|---|---|
| ||||||||
<dependencies>
	<dependency>...</dependency>
	<dependency>...</dependency>
</dependencies> |
biz.aQute.bnd:bndlib
This dependency enables the Declarative Services annotations used within the IGB code base that allow easy service consumption and registration with the IGB OSGi component runtime.
Note how that scope tag is "provided" - this is because the parent pom.xml file defines this dependency in its dependencyManagement tag. When mvn compiles your App, mvn will retrieve necessary metadata about the dependency, such as its version and other information, from the parent pom.
| Code Block | ||
|---|---|---|
| ||
<dependency>
   <groupId>biz.aQute.bnd</groupId>
   <artifactId>bndlib</artifactId>
   <scope>provided</scope>
</dependency> |
org.slf4j:slf4j-api
The IGB logging system uses this API. To log error or status messages, using this. For more information see http://www.slf4j.org/manual.html.
| Code Block | ||
|---|---|---|
| ||
<dependency>
    <groupId>org.slf4j</groupId>
    <artifactId>slf4j-api</artifactId>
    <scope>provided</scope>
</dependency> |
com.affymetrix:igb-services
This module is an API module that contains most of the service interfaces which provide access (hooks) to functions in the IGB platform, such as identifying the currently selected feature or tracks.
| Code Block | ||
|---|---|---|
| ||
<dependency>
       <groupId>com.affymetrix</groupId>
       <artifactId>igb-services</artifactId>
       <scope>provided</scope>
</dependency> |
com.affymetrix:igbSwingExt
This module contains custom Swing components used in the IGB graphical user interface. In some cases the interfaces contained in the igb-services modules require the use of some of the custom swing components contained in this module. We do this because we often have the need to add additional functions to basic swing components, such as the concept of "weights" for menu items to ensure that newly added menu options appear in the correct order.
| Code Block | ||
|---|---|---|
| ||
<dependency>
     <groupId>com.affymetrix</groupId>
     <artifactId>igbSwingExt</artifactId>
     <scope>provided</scope>
</dependency> |
build, plugins, and plugin tag
maven-bundle-plugin
This is the most important plugin to be aware of as an IGB module developer. This plugin is known as the "Swiss army knife of OSGi" and is a wrapper around the BND project described in the previous section.
| Code Block | ||
|---|---|---|
| ||
    <build>
        <plugins>
            <plugin>
                <groupId>org.apache.felix</groupId>
                <artifactId>maven-bundle-plugin</artifactId>
                <extensions>true</extensions>
                <executions>
                    <execution>
                        <id>build plugin repository</id>
                        <goals>
                            <goal>
                                index
                            </goal>
                        </goals>
                        <phase>package</phase>
                        <configuration>
                            <obrRepository>${project.build.directory}</obrRepository>
                            <mavenRepository>${project.build.directory}</mavenRepository>
                        </configuration>
                    </execution>
                </executions>
                <configuration>
                    <instructions>
                        <Bundle-SymbolicName>${project.artifactId}</Bundle-SymbolicName>
                        <Import-Package>*</Import-Package>
                        <Export-Package/>
                        <Service-Component>*</Service-Component>
                    </instructions>
                </configuration>
            </plugin>
        </plugins>
    </build>
|
There are several important things to understand about the above configuration.
...
- The metadata can optionally include service component definition files as described in the OSGi Declarative Services Specification (See http://wiki.osgi.org/wiki/Declarative_Services for more information)
- We use annotations in our java code which are processed at compile time by the felix maven bundle plugin to generate the service component definition files for a bundle.
...
Add a new item to the IGB Tools menu
To demonstrate how an IGB plugin could hook into and expand the IGB toolbar, you will write a new class that implements the IgbMenuItemProvider interface.
This interface is designed to allow App developers to add new menu items to the IGB application's top level menus.
IGB (as of this writing) has seven top-level menus, including:
...
the
...
| Code Block | ||||
|---|---|---|---|---|
| ||||
public interface IgbMenuItemProvider {
    public IgbToolBarParentMenu getParentMenu();
    public JRPMenuItem getMenuItem();
    public int getMenuItemWeight();
} |
Note that this interface will likely change in future releases of the IGB API. The getParentMenuName method will likely a custom enum type and not a String literal. Additionally, we will add "weight" as an attribute to our custom JMenuItem class. So it is likely this interface will ultimately contain one simple getMenuItem() method.
Create new Java class IgbToolbarExtension
Within NetBeans, check that your "hello world" project is the currently selected project - the name of the currently opened project is shown on the NetBeans title bar. If it isn't, select File > Open Project to open it.
Next, create a new Java class named IgbToobarExtension:
- Select File > New File
- Under Choose File Type, select Java
- Select Next
- Enter class Name IgbToolbarExtension
- Select package com.lorainelab.plugin
- Select Finish

Edit your file to match the following code into your new Java class file.
Note that NetBeans has added the package and class declarations.
| language | java |
|---|
IGB
Toolbar", null, "", null); } public LogEventAction(String text, ImageIcon icon, String desc, Integer mnemonic) { super(text, icon); putValue(SHORT_DESCRIPTION, desc); putValue(MNEMONIC_KEY, mnemonic); } @Override public void actionPerformed(ActionEvent e) { logger.info("Hello Igb Toolbar menu item clicked"); } } }
About the implementation class
The @Component annotation
code
| language | java |
|---|
@Component(name = IgbToolbarExtension.COMPONENT_NAME, immediate = true, provide = IgbMenuItemProvider.class)
public class IgbToolbarExtension implements IgbMenuItemProvider {...}
This annotation is processed by the felix maven-bundle-plugin (BND) and declares that the OSGi runtime will manage creation and destruction of any instances of this class. This is an important point to understand about how OSGi-based applicaitions function. Your code will not directly manage the life cycle of your class. Instead, you specify the behavior and lifecycle of your objects using annotations.
The immediate=true annotation attribute specifies to the OSGi runtime that this component should be instantiated immediately instead of lazily.
See http://www.aqute.biz/Bnd/Components for more information about the annotation attributes.
The LogEventAction
When a user selects your new menu item, this action will execute. Note it prints a message to the IGB console. Note also that it uses the SLF4j API to log events to the IGB console.